A big first birthday is coming up for a special little girl and Nana wanted to make her a special shirt for the party.
I went to my Premier +2 Create and decided I would use some shapes and make appliques for this shirt. So there is a couple of ways to do this, one slower and one in Quick Create.
I did it with the slower way and drew out my shapes and then created the stitches, mainly because I wanted to manipulate some of the design. So the circled are is where I selected my shapes and drew out the sizes.
You could use the Quick Create part of the Premier +2 Create. Here is a screen shot and the choices to select to get the shape
I wanted a simple design for the birthday girl, after all this shirt will be the one she eats birthday
cake!
One thing about the software is you can move the order around on this film strip side. That helped me because I did the order wrong, so I needed to do the applique stitch out and then do the satin stitch on top. My first time on the trial stitch out, I didn't do it this way. My order was all the applique and then back to satin. Well, that wasn't correct, some shifted and the satin stitches didn't line up.
I need to back track a bit and talk about a step I did in the Create, I didn't want the satin stitches to be "seen" under the layers. This meant deleting the satin stitches and recreating those satin stitches on the visible areas only. It is a step called "Select Similar from Visible" and delete.
Here is my design with satin only on the visible areas.
This design was saved and opened in Premier +2 Embroidery Ultra to add the text.
I went with Abbi font for the "Birthday Girl" with a letter in the middle of the rectangle for a bit of personal touch
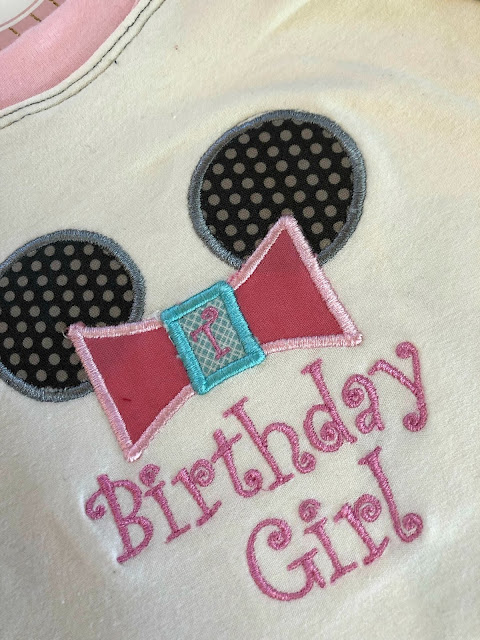
Here is the design stitching out on the Pfaff Creative Icon, the applique does make it quicker
One more close look. I need to work a bit on my corners but it is all a learning curve and I am learning all the time!
The back has her name and a large applique number 1 on the back. The knit was all from stash and I did double layer the front. What I mean is I embroidered on the front and then added another layer of knit to sandwich the embroidery. I didn't want have that touching her skin and on the back I didn't have enough extra fabric so I used some knit tricot interfacing to cover the embroidery.
The raglan sleeve shirt is from the Kwik Sew for Toddlers Book, used by me for clothes for this little girl's mommy. So sweet to continue the sewing tradition.
Happy Birthday my sweet little T!


What a darling shirt! That machine looks amazing.
ReplyDelete